The ( current/jan-2013 ) beta status of the first batch of smoothieboards leads to new users having much of the same questions, which are not really answered in the documentation.
This is a guide for new users of smoothieboard in general, with specific information about whatever is specific to this first beta batch.
Unpacking
When unpacking your smoothieboard, you'll see it looking something much like this :
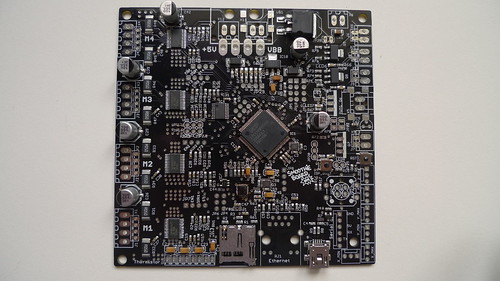
As you can see, it lacks most of its connectors. This is so you have the choice to solder whatever connectors is best for your particular setup. This also means you'll have to solder them.
Connectors
A great way to see what connector options you have for each connection is to look at this picture ( or click on it ) :
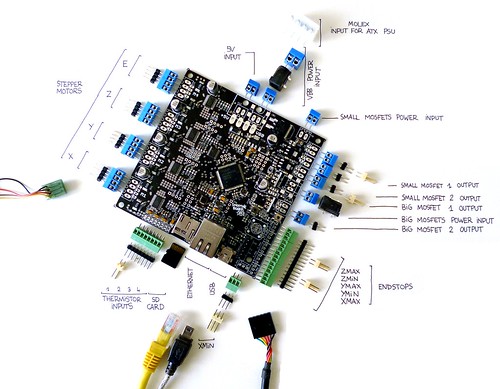
- The blue screw terminals are 3.5mm pitch screw terminals ( except for the bigger one at the power input, that is 5mm ). Those are extremely common.
- The green screw terminals are 2.54mm screw terminals. They are nice but more difficult to come by. Much cheaper for 2.54mm are the :
- Black 2.54mm pins.
You can find links to buy those connectors on the smoothieboard page, in the "border connectors" section.
The cheapest option is simply to use 2.54mm pins for everything ( except power ), but your choice really depends at what is at the end of the wires on your printer : screw terminals are a more "universal" option.
To run a 3D printer with smoothie, you'll need to solder connectors to the following :
- Stepper motor 4-pins connectors
- VBB power input
- All small and big mosfet input and outputs
- Small and big mosfet power select ( see here ).
- Endstop connectors
- Thermistor connectors
Once the connectors are soldered, you can start actually doing stuff with your Smoothieboard :
MicroSD card
Smoothieboard doesn't come with a microsd card, but it needs one.
If you don't already have one, you want to get one ( they are a few bucks on ebay ).
If you already have one, you are faced with a choice : the bootloader that was flashed on the beta boards is a bit old, and does not support SDHC cards.
This means that if your card is more than 2GB in size, it won't be able to use it. So if your microSD card is bigger than 2GB, you can either :
- Flash a newer bootloader that supports SDHC cards, see flashing-the-bootloader.
- Or get a 2GB or less microSD card.
Firmware
Now that you have a bootloader installed, you can update the firmware.
You very probably want to do this. The firmware you have corresponds to the "master" branch in the github repo. While it works for most things, it's quite old, and the USB stuff will probably give you trouble. It also does not support SDHC cards.
The edge branch on the other hand ( https://github.com/arthurwolf/Smoothie/tree/edge ) has all of the latest stuff, including SDHC support, and the new USB stack ( and a whole bunch of added features ).
Getting and compiling and flashing smoothie is pretty well documented, just remember you want the "edge" branch :
Once the firmware is flashed onto the board ( you know it is because the firmware file is renamed on the sd card ), we move on to config :
Configuration
Smoothie gets its configuration from a small file named "config" that you drop in the root of the SD card.
You can find information on the page configuring-smoothie.
Once you have copied the file under the name "config" on the sd card, you can move on.
I hate Windows
Seriously. If you are unfortunate enough to be a Windows user, you want to go read this page : windows-drivers to get USB to work on your smoothieboard.
If something does not work, you can contact the team via IRC.
If you are a Linux or Mac user, don't worry about a thing, it'll all work out of the box.
Talking to Smoothie
Now Smoothie is flashed on your smoothieboard, and your computer is ready to talk to it.
Plug smoothieboard in using the USB-mini cable.
You will see a USB mass-storage device ( much like USB flash drives ) pop up : it shows you the contents of the microSD card. You can use it at anytime to access/modify files, drop gcode files in etc.
Now you will want to install a serial terminal program to talk to your smoothieboard.
You can also simply use Pronterface if you want a more "control-oriented" interface and start printing right away.
Now use your program of choice to talk to Smoothie. The interface will be named :
- COM1 or something similar in Windows
- /dev/ttyACM0 or something similar in Linux
- /dev/tty.usbmodem412 or something similar in OS X
Once the serial terminal is up and running resetting the board should display smoothie ok in the terminal.
You are now connected to Smoothie and you can start talking to it. A few commands :
- ls /sd/ lists the file in the current folder or here in the "/sd/" folder
- cd /sd/ changes the path to the "/sd/" folder
- play /sd/file.g -q plays the gcode file indicated. The -q option is optional an makes the play silent.
- G1 X10 F100 moves the robot 10 millimeters in the X axis, at 100mm/minute.
Have fun !